|
|
|
|
|
 |
be the perfect host/ess |
. |
|
||||||||||||
copyright ©1999-2000 |
More assembly required … 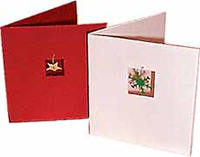 Warning:
your first attempt at sewing the star/snowflake in place on the card
will, I repeat WILL, take some time. You’ll get your thread tangled,
or you won’t have centered the confetti piece properly, or you’ll
tug too hard while tying your knot, thus tearing a big hole in the card.
Trust me when I say that you'll rapidly get the hang of it. Warning:
your first attempt at sewing the star/snowflake in place on the card
will, I repeat WILL, take some time. You’ll get your thread tangled,
or you won’t have centered the confetti piece properly, or you’ll
tug too hard while tying your knot, thus tearing a big hole in the card.
Trust me when I say that you'll rapidly get the hang of it.
materials | large star and/or snowflake confetti (available at craft stores), thread, needle, cardstock (try something with a subtle texture/pattern) 1. Cut an 8.5"x4.25" piece of cardstock, using a razor knife and ruler. Fold in half to make a square card. (You could also make a standard-size card by cutting an 8.5"x5.5" piece).2. Use a razor knife to cut a neat square opening just above the center of the card. You’ll want the opening to be just a bit bigger than your star or snowflake. 3. Cut a piece of thread approximately 20" long. Fold it 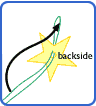 in half to make a loop. Pull about
2" or so of the loop end
through the eye of the needle. Insert the needle in the star/snowflake,
moving back to front, and pull the loop through.
in half to make a loop. Pull about
2" or so of the loop end
through the eye of the needle. Insert the needle in the star/snowflake,
moving back to front, and pull the loop through.4. Remove the needle. Take the two loose ends of the thread and bring them up and through the loop, forming a knot that slips around the star/snowflake. 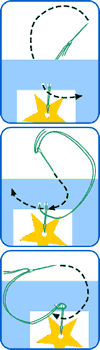 5. Thread both loose ends through the eye of the needle. Poke two holes, centered and approximately 1/8" apart, above the upper edge of the square opening that you cut in your card. Hold the star/snowflake in the center of the square opening while you’re sewing, to make sure that you leave the proper amount of thread hanging. With the front of the card facing you, push the needle through the right hole, moving front to back. Then bring the needle through the left hole, moving back to front. 6. Make a double knot on the front, as shown in the diagram, tugging the star/snowflake gently to adjust the positioning. Push the needle back through the right hole, then trim off the excess thread with scissors. what's that? you say you want something fancier? ---------------------------> lounge . nourish . host . laze . home .
|
||||||||||||||