| .. |
holiday
talk + more.
Jump
to the discussion boards
and talk
about etiquette, entertaining, cooking, and more.
|
copyright ©1999-2000
DigsMagazine.com.
|
ho,
ho,
holiday
Cards
3 cool cards you CAN
try at home |
1
2 3
4
continued from page 2
|
Fancy stuff …
Holiday Present/Ornament Card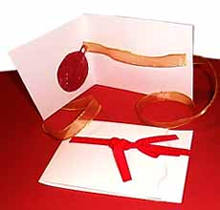
My college graphic design
professor used to say that a good card has a
surprise. It says one thing when it’s closed; then transforms into
something else once it’s opened. This card starts off as a present,
tied up in a simple ribbon bow. Untying the bow to open the present/card
reveals a Christmas tree ornament "hanging" off the ribbon.
materials |
cardstock/watercolor paper, decorative ribbon, razor
knife (such as an Exacto blade), hole punch
1. Cut a letter-size piece of cardstock in half, lengthwise, to get an
11"x4.25" size piece of card.
2. Cut out a 28" length of ribbon.
3. Fold the cardstock asymmetrically, leaving a 1" or so
difference between the card front and the card back. Decorate the front
edge by slicing it at a slant (use a razor knife and ruler to get a
crisp line), using scissors to cut a wave, or gently tearing off the
edge. razor knife and ruler to get a
crisp line), using scissors to cut a wave, or gently tearing off the
edge.
4.
Lay the card flat on a clean cutting surface. Use your knife to
cut two slits: one on the front of the card, about ¼" in from the
fold, and just above the horizontal center, and a corresponding one on
the back of the card, ¼" in from the right edge of the card. The
length of the slit should be just slightly larger than the width of your
ribbon. corresponding one on
the back of the card, ¼" in from the right edge of the card. The
length of the slit should be just slightly larger than the width of your
ribbon.
5. Pencil in the outline of a Christmas tree ornament on the back of
your decorative paper. Don’t trust your artistic skills? Print out our
template and use it to trace out your shapes. Cut out the ornament. out your shapes. Cut out the ornament.
6.
Use a hole punch to create a hole in the top of the ornament. Cut
a slit for the ribbon to go through, as shown.
7.
Glue the ornament on the inside of the card, making sure that the
slit on the ornament lines up with the slit on the front of the card.
8.
Thread your ribbon through the two slits. Close the card and tie
the two ends of the ribbon into a neat bow.
o
check
out these related articles:
pretty up that cake
--------------------------->
lounge . nourish
.
host . laze
. home .
|