| .. |
big
decorating
dreams. tiny
little
budget.
don't
be a wallflower! jump
on over to the discussion boards
and get decorating help.
|
copyright ©1999-2002
DigsMagazine.com.
|
matting matters
how to mat your
pictures like a pro by
Yee-Fan Sun |
1 2
3 4
5
continued from page 4
|

5
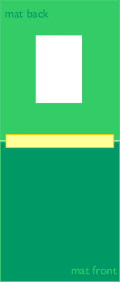
Congratulations! You now have one
piece of mat board with a window cut out of the middle. Place the
window piece front side down. Line up the top edge of the solid piece
that you cut earlier, front-side up, with the bottom edge of the window
mat. Cut a piece of hinging tape that’s a little shorter than the
width of the mat, then moisten it with a damp sponge. Press down the
tape so that half of it sticks to the bottom edge of the window mat, and
the other half sticks to the top of the solid mat.
6
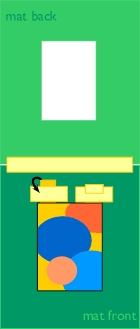
With the mat open, place your picture so that it sits approximately in
the center of the back piece of board. Close the window to check the
picture position; partially lift the window and adjust as necessary.
Carefully lift the window, making certain not to move the picture (you
can weight the picture with something soft and non-damaging if you’re
so inclined – wrap your weight in cloth if necessary).
If you’re using double-sided tape, just tape the picture at the top
two corners. If you’re using photo corners, lightly mark the corners
of the picture using a pencil, and remove the picture. Stick photo
corners on each corner of the picture, and line up the picture with the
pencil marks you just drew. Close the window to make sure that nothing’s
shifted; open the window, then firmly press down the corners.
 There’s
actually a third method you can use to attach your artwork to the mat
board, using your acid-free hinging tape, that works well for pictures
that are too big/heavy to use with photo corners, but that you’d still
like to be able to potentially remove from the mat someday. With the
image held in place (with this method, you’ll definitely want to
weight it), carefully attach two short strips of tape (about 3") at
the top of the image, sticky-side up, and in such a way that half the
tape adheres to the back of the image, while the other half extends
above it. Cut two more short strips of tape and use them to hold the
first two strips in place against the mat board; just press them down so
that they sit parallel and just above the top edge of the artwork. Fold
down the remaining exposed bits of vertical tape, and stick them to the
horizontal strips. There’s
actually a third method you can use to attach your artwork to the mat
board, using your acid-free hinging tape, that works well for pictures
that are too big/heavy to use with photo corners, but that you’d still
like to be able to potentially remove from the mat someday. With the
image held in place (with this method, you’ll definitely want to
weight it), carefully attach two short strips of tape (about 3") at
the top of the image, sticky-side up, and in such a way that half the
tape adheres to the back of the image, while the other half extends
above it. Cut two more short strips of tape and use them to hold the
first two strips in place against the mat board; just press them down so
that they sit parallel and just above the top edge of the artwork. Fold
down the remaining exposed bits of vertical tape, and stick them to the
horizontal strips.
Close the window again and voila – you’re now the proud-owner of
a beautifully-matted picture that’s now ready to be popped into its
frame.
get printer-friendly instructions
o
check
out these related articles:
gallery-style picture tracks | hang-up
help | frame it | post-posters
--------------------------->
lounge . nourish .
host
. laze . home.
|

