| .. |
big
decorating
dreams. tiny
little
budget.
don't
be a wallflower! jump
on over to the discussion boards
and get decorating help.
|
copyright ©1999-2005
DigsMagazine.com.
|
dough
it right
how to make salt dough ornaments
by Yee-Fan Sun |
1
2 3
4
continued from page 3
the great
bake-off
Once you've filled up your tray with ornaments (you can pack them in
fairly close, as these won't really expand as they bake), you're ready
to pop them in the oven, which should be preheated to 250F. Some recipes
for salt dough ornaments call for a higher baking temperature, but
upping the dial can result in unsightly cracks and browning of the
dough, so I prefer to stick with the lower, safer temps.
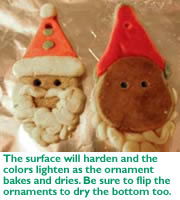 Bake
until the cookies have hardened -- this can take four hours or even
more, depending upon the thickness of the ornaments. You'll want to
check on the ornaments from time to time, and flip them over once the
top side is mostly hardened to ensure that the bottom dries out as well.
As the ornament bakes the colors will lighten as the moisture is cooked
off; dark patches generally indicate spots that still have some
moisture. If the drying process seems to be taking particularly long,
you can also help speed up the process by removing the mostly-dried
ornaments from the baking sheet, and placing them directly on the oven's
wire rack (provided the wires aren't spread so far apart that your
ornaments fall through). Having both sides exposed to the warm air
should help speed things along somewhat. Bake
until the cookies have hardened -- this can take four hours or even
more, depending upon the thickness of the ornaments. You'll want to
check on the ornaments from time to time, and flip them over once the
top side is mostly hardened to ensure that the bottom dries out as well.
As the ornament bakes the colors will lighten as the moisture is cooked
off; dark patches generally indicate spots that still have some
moisture. If the drying process seems to be taking particularly long,
you can also help speed up the process by removing the mostly-dried
ornaments from the baking sheet, and placing them directly on the oven's
wire rack (provided the wires aren't spread so far apart that your
ornaments fall through). Having both sides exposed to the warm air
should help speed things along somewhat.
the finish
After you've finished
baking the ornaments into a sufficiently hardened state, let them sit
out on wire drying racks for another day or two (this ensures that
they'll really be fully dried-out). At this point, you can use paint to
add whatever details you like to your ornaments, or leave them as is.
It's also a nice touch to add initials and date to the back of each
ornaments (fine-point permanent marker is easier to work with than paint
for this purpose). Whether you've decided to paint or not, you'll want
to finish off your little works of art by giving them a couple of coats
of clear varnish (either paint-on or spray varieties). The varnish will
add an extra protective layer to keep your ornaments preserved for
years; if you choose a gloss variety, it'll also add a nice shine to the
ornaments and perk up the colors to boot.
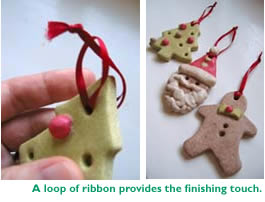 Of
course, you're not quite done yet. Remember that hole you made a point
to remember to poke at the top of each ornament? Time now to put it to
use. Take a 9" length of narrow ribbon; bring the ends of the
ribbon together and tie into a knot. You'll have a lovely little loop of
ribbon. Pull the loop end of the ribbon through the hole in the
ornament, so that you have the loop on one side and the knot on the
other. Bring the knot end through the loop, and pull taut. Voila -- pop
your ornament on your tree and admire it for years to come, or wrap it
up as a lovely gift for someone else to enjoy! Of
course, you're not quite done yet. Remember that hole you made a point
to remember to poke at the top of each ornament? Time now to put it to
use. Take a 9" length of narrow ribbon; bring the ends of the
ribbon together and tie into a knot. You'll have a lovely little loop of
ribbon. Pull the loop end of the ribbon through the hole in the
ornament, so that you have the loop on one side and the knot on the
other. Bring the knot end through the loop, and pull taut. Voila -- pop
your ornament on your tree and admire it for years to come, or wrap it
up as a lovely gift for someone else to enjoy!
o
check
out these related articles:
o christmas tree |
deck the halls | sweater
stockings | holiday cards
| gift ideas within reason | good
enough to eat edible
gifts | eat
it, don't wear it more
edible
gifts
--------------------------->
lounge . nourish .
host
. laze . home.
|