|
| .. |
need
cooking inspiration? jump to the
boards
to get advice.
|
copyright
©1999-2000
DigsMagazine.com.
|
|
Crepes
101
how
to cook perfect crepes |
1
2 3 4
continued
from page 1
|
Get cooking | Itís completely unnecessary to run out and buy
one of those special crepe pans you sometimes see in fancy cookware
shops. Any old nonstick skillet or well-seasoned cast-iron skillet will
work just fine for making crepes. Youíll have an easier time making
perfect crepes using a small skillet, at least when youíre first
starting out Ė my preference is an 8" cast-iron skillet with a
7" base, but anything between 8" and 10" in diameter is
good. Before you start cooking your crepes, spray or brush on a very,
very thin coat of canola oil to cover the bottom of the pan. You donít
want a visible layer of oil; the idea is to get the pan greased up just
enough that the crepes wonít stick.
| Stoves vary
considerably from model to model, so youíll have to do a bit
of experimenting to find the perfect temperature. On my old gas
range, I turn the heat to medium-high, which is a good starting
point if you havenít a clue how hot or cool your stove runs.
Let the pan heat up for two minutes or so, then lift the pan by
the handle (use a mitt if youíre using a cast-iron skillet)
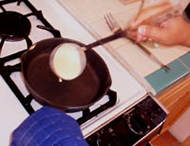
and hold it at a slant. As you pour in a small amount of batter
Ė I use a scant quarter-cup for my 8" pan Ė swirl the
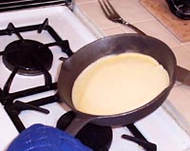
pan around to spread the batter evenly across the bottom. If the
pan is properly heated, the crepe should begin to set right
away. Fill in any holes in your crepe with a drop of batter from
a spoon. Once the crepe is set (two to three minutes tops),
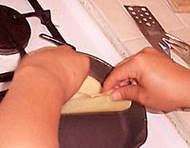
gently loosen the edges of the crepe with a spatula. At that
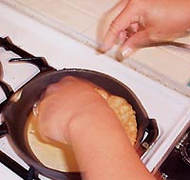
point, I use my fingers to quickly flip the crepe over, but you
can use the spatula if donít want to chance burning your
delicate little digits. Gently press the flipped crepe down on
the pan, and cook for another 30 seconds or so. The finished
crepe will be a light golden color (whiter if youíve left out
the sugar) and flexible. |


step
1: pour batter
step 2:
swirl batter
step 3:
loosen +
peel
step 4: flip
and
press
|
that's
right, there's so much more ...!
--------------------------->
lounge .
nourish .
host
. laze . home.
|

