| .. |
big
decorating
dreams. tiny
little
budget.
don't
be a wallflower! jump
on over to the discussion boards
and get decorating help.
|
copyright
©1999-2000
DigsMagazine.com.
|
hanging
by
a
wire
by Tasha Moss |
1
2 3 4
5
continued from page 2
|
Installing the hardware
5.
Drill a hole at your pencil marks [photo
2]. Make 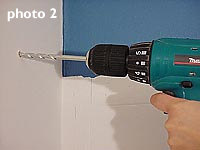 sure
that the size of the drill bit corresponds with the size of the plastic
anchor. If the anchor is 3/16", use a 3/16" drill bit. If
you're unsure of the anchor size, use your judgement. It's better to
drill a hole that's too small and work your way up than it is to drill a
hole that's too big!
6.
Push an anchor into each hole, tapping them into place with a heavy
blunt object (a hammer or the back of your drill works well). sure
that the size of the drill bit corresponds with the size of the plastic
anchor. If the anchor is 3/16", use a 3/16" drill bit. If
you're unsure of the anchor size, use your judgement. It's better to
drill a hole that's too small and work your way up than it is to drill a
hole that's too big!
6.
Push an anchor into each hole, tapping them into place with a heavy
blunt object (a hammer or the back of your drill works well).
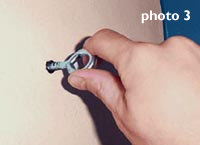 7.
Twist your screw eyes into the anchored holes you've just made [photo
3].
It gets a bit harder as you
tighten, but you want to get them in as far as possible to make sure
they're sturdy. Line up the eyes (the circular part) vertically. 7.
Twist your screw eyes into the anchored holes you've just made [photo
3].
It gets a bit harder as you
tighten, but you want to get them in as far as possible to make sure
they're sturdy. Line up the eyes (the circular part) vertically.
Setting up the
wire
8. This
is the trickiest part of the whole process— measuring to attach the
wire and turnbuckles. A turnbuckle works by allowing you to adjust the
tension on the wire. You have to plan for this adjustment when you’re
making measurements. Start with the measurement between the screw eyes
(where your original pencil marks used to be). That was 72 inches in my
example. Measure the length of each turnbuckle when the eye is about
halfway extended (which allows for the adjustment I mentioned).
9. Time
for a little basic math. Say you found each turnbuckle was 4 inches
long. Subtract the combined length of both turnbuckles from the length
between your screw eyes. In my example that would be:
72 inches (length
between screw eyes) – 8 inches (combined
length of 2 turnbuckles) = 64 inches
64 inches will be the length of the wire stretched
across the wall.
still
more this way ...
--------------------------->
lounge . nourish .
host
. laze . home.
|