| .. |
big
decorating
dreams. tiny
little
budget.
don't
be a wallflower! jump
on over to the discussion boards
and get decorating help.
|
copyright ©1999-2001
DigsMagazine.com.
|
sew what?
a guide to sewing
basics
|
1 2
3
continued
from page 2 |
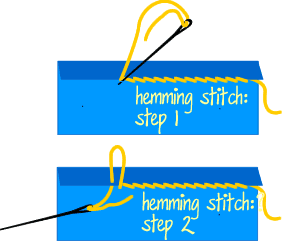
Hemming stitch: Use this stitch for, you guessed it, hemming.
 1. Hide the knot within the hem, and pull the threaded needle up through the hem. 1. Hide the knot within the hem, and pull the threaded needle up through the hem.
2. Moving further along the sewing "line" (with this stitch, you're actually making little diagonal stitches on either side of the line marked by the edge of the hem), use the needle to gather a few threads of the fabric that lies just outside the hem, and pull the needle through gently.
(Keep the gathered bits of fabric small to ensure a nice, nearly-invisible stitch on the front side of the fabric.)
3. Push the needle back down through hem fold, but not all the way through to the front side of the fabric. Pull the needle out from under the fold.
4. To continue stitching, repeat starting from step 2.
How to sew a hem (by hand)
Granted, it's a lot easier to sew a hem with a sewing machine, but for small projects
— shortening pants, mending any unraveled hem, even whipping up a set of small curtains
— there's no need to throw away eight bucks or so at the tailor's … just do it yourself!
1. Gently take apart the existing hem, if there is one, using a long needle or pin (there are also special seam ripper tools available), and sharp scissors. Be vigilant about pulling the thread up and away from the fabric before you snip
— you don't want to be stuck with a big hole in your fabric.
2. Determine your hem length. If you're hemming a pair of pants, try on the pants, fold the pants to the desired length (make sure you try them on with shoes). (This act requires far less contortion if you can get a pal to help you). Pin the hem in place. (Remember, you'll want to fold the hem inwards, so that the excess fabric is on the
inside rather than showing).
3. Iron the fabric to get a stiff crease. Snip off excess fabric, leaving at least 1" for the hem (it's a good idea to leave a wider hem if this is your first time hemming … it'll give you more room to work with in case you find you need to lengthen).
4. Turn in the raw edge of the fabric ¼-½ ", and iron again. You should now have neatly pressed, ready-to-go hem.
5. Start sewing, using the hemming stitch explained.
o
check out these
related articles:
make a futon cover | make
a throw pillow cover |
sew a duvet cover | curtain time
--------------------------->
lounge . nourish .
host
. laze . home.
|

