 |
|
|
|
|
 |
|
. |
|
||||
copyright ©1999-2004 |
let's
roll!
make fabric roller shades by Yee-Fan Sun | 1 2 3 continued from page 1 1 Take down the old roller shade, and remove the original material, as well as the wooden slat or dowel that weighted it. Scribble a little arrow on the shade barrel to mark which way the fabric fell -- this'll make your life easier later on, when it comes to reattach. Measure the old material, then add a couple inches to the width, and three inches to the length to get your new fabric dimensions. (This assumes that the old shade was already cut to fit your window properly; if you've co-opted an old shade from a different window, you'll basically want the fabric height to be about a foot longer than the height of the window, and the width to be two inches or so more.) 2 Trim your fabric to the proper dimensions, and iron the fabric. Make sure you use the heat setting appropriate to your material, unless you want to do what I did on my first attempt, which was to melt my polyester fabric to my iron.
---------------------------> lounge . nourish . host . laze . home. |

 3
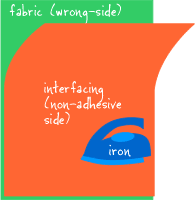
Read the instructions that came with your interfacing; trim the
interfacing so it's about the same size as the fabric you cut in the
preceding step. Most likely, the directions will inform you to place
your fabric wrong-side up on the ironing board, then line up the
interfacing on top, with the adhesive side facing down towards the
fabric (the adhesive side will feel rougher). Working from the center of
the fabric, press and glide a steam iron over the interfacing, doing
your best to avoid wrinkles. Patience and a gentle touch are key; you'll
have to do quite a few passes over the fabric to get the interfacing to
stick. Once the interfacing seems more or less bonded, flip the fabric
and iron till it's good and flat.
3
Read the instructions that came with your interfacing; trim the
interfacing so it's about the same size as the fabric you cut in the
preceding step. Most likely, the directions will inform you to place
your fabric wrong-side up on the ironing board, then line up the
interfacing on top, with the adhesive side facing down towards the
fabric (the adhesive side will feel rougher). Working from the center of
the fabric, press and glide a steam iron over the interfacing, doing
your best to avoid wrinkles. Patience and a gentle touch are key; you'll
have to do quite a few passes over the fabric to get the interfacing to
stick. Once the interfacing seems more or less bonded, flip the fabric
and iron till it's good and flat.