|
 Replacing old, ugly roller shades
with whatever fun fabric suits your fancy turns out to be a quickie
project that can be easily tackled in a free evening -- perfect for lazy
decorators like yours truly. Heck, you don't even need to know how to
sew -- with the help of some fabulous heat-fusible products, you can do
it all with an iron and ironing board. Replacing old, ugly roller shades
with whatever fun fabric suits your fancy turns out to be a quickie
project that can be easily tackled in a free evening -- perfect for lazy
decorators like yours truly. Heck, you don't even need to know how to
sew -- with the help of some fabulous heat-fusible products, you can do
it all with an iron and ironing board.
what you'll
need
fabric -- Bear in mind that plush/super-thick fabrics won't roll
up smoothly, and super-sheer fabrics won't offer much in the way of
privacy. Other than that, just about anything goes! Rummage through the
remnants bin of your friendly neighborhood fabric store or look for
funky vintage tablecloths and curtains at your favorite thrift store for
good deals.
iron-on interfacing (aka fusible interfacing)
no-fray liquid (aka seam sealant)
no-sew tape (you can also use a sewing machine if your prefer)
thread
scissors
iron and ironing board
colored pencil that'll show up on your fabric
t-square/straightedge
old roller shade
1
Take down the old roller shade, and remove the original material, as
well as the wooden slat or dowel that weighted it. Scribble a little
arrow on the shade barrel to mark which way the fabric fell -- this'll
make your life easier later on, when it comes to reattach. Measure the
old material, then add a couple inches to the width, and three inches to
the length to get your new fabric dimensions. (This assumes that the old
shade was already cut to fit your window properly; if you've co-opted an
old shade from a different window, you'll basically want the fabric
height to be about a foot longer than the height of the window, and the
width to be two inches or so more.)
2
Trim your fabric to the proper dimensions, and iron the fabric. Make
sure you use the heat setting appropriate to your material, unless you
want to do what I did on my first attempt, which was to melt my
polyester fabric to my iron.
 3
Read the instructions that came with your interfacing; trim the
interfacing so it's about the same size as the fabric you cut in the
preceding step. Most likely, the directions will inform you to place
your fabric wrong-side up on the ironing board, then line up the
interfacing on top, with the adhesive side facing down towards the
fabric (the adhesive side will feel rougher). Working from the center of
the fabric, press and glide a steam iron over the interfacing, doing
your best to avoid wrinkles. Patience and a gentle touch are key; you'll
have to do quite a few passes over the fabric to get the interfacing to
stick. Once the interfacing seems more or less bonded, flip the fabric
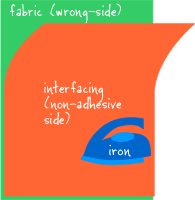
and iron till its good and flat. 3
Read the instructions that came with your interfacing; trim the
interfacing so it's about the same size as the fabric you cut in the
preceding step. Most likely, the directions will inform you to place
your fabric wrong-side up on the ironing board, then line up the
interfacing on top, with the adhesive side facing down towards the
fabric (the adhesive side will feel rougher). Working from the center of
the fabric, press and glide a steam iron over the interfacing, doing
your best to avoid wrinkles. Patience and a gentle touch are key; you'll
have to do quite a few passes over the fabric to get the interfacing to
stick. Once the interfacing seems more or less bonded, flip the fabric
and iron till its good and flat.
4
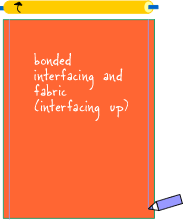
Time now to trim the reinforced fabric down to the proper width. Measure
the length of the shade barrel; this is how wide you'll want your fabric
to be. Use a t-square/straight-edge and colored pencil to mark where
you'll cut, but don't start snipping just yet.
5
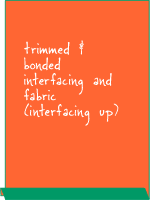
Dab the no-fray liquid all along both penciled lines. Let dry, then
carefully trim your fabric (work in long, smooth cuts). At this point,
you might discover that your interfacing isn't quite stuck to the edges
in a few spots. Iron all along the edges until well sealed; you can also
use a lil' bit more no-fray to give the edges a little more help in the
bonding department.
 6
Fold the bottom edge of the fabric to make a ¾" inch hem. Then
make another fold that's a little bigger than the height of the wooden
slat or dowel you reserved in step one. Cut a piece of no-sew tape
that'll stretch the width of the fabric, then tuck the tape between the
shade and the doubled-over fold. Iron (again, use the appropriate heat
setting for your material) until you have a nice, secure hem. Slide in
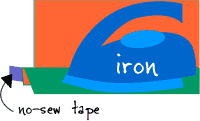
the wooden slat/dowel. 6
Fold the bottom edge of the fabric to make a ¾" inch hem. Then
make another fold that's a little bigger than the height of the wooden
slat or dowel you reserved in step one. Cut a piece of no-sew tape
that'll stretch the width of the fabric, then tuck the tape between the
shade and the doubled-over fold. Iron (again, use the appropriate heat
setting for your material) until you have a nice, secure hem. Slide in
the wooden slat/dowel.
7
Use a staple-gun to attach the top-edge your new shade to the shade
barrel, making certain that the shade falls in the right direction. Roll
it up, install, and enjoy!
|
