 |
|
get handy: cheap and easy corner SHELVES | instructions
|
shopping list (to make 4 corner shelves) | 4 – 8"x10" shelf brackets* 4 – 6"x8" shelf brackets* 24 – #6 x ¾" wall screws with plastic anchors (to screw into the walls; the screws should be labeled for masonry/hollow wall use) 24 – #6 x ½" screws (to screw into the boards) paint * if you’re not putting lots of heavy things on your bookshelves, you can definitely substitute the smaller 6"x8" shelf brackets for the 8"x10"s … your brackets will then be nice and symmetrical.helpful tools | You can make do with no more than a wood saw, a drill, a straightedge/ruler, a pencil, and a screwdriver. Having a table saw (best) or circular saw will make cutting the board a heck of a lot faster; an electric drill with screwdriver attachment will come in mighty handy. And, as with most home improvement-type projects, it always helps to have a friend around, who can hold things up against the wall while you check for placement/levelness.directions |  1. Draw a line between any two points along the
circumference of your circular board. To make step 2 a little easier,
make the length of the line a number that’s easily divisible by two (I
chose 20").
1. Draw a line between any two points along the
circumference of your circular board. To make step 2 a little easier,
make the length of the line a number that’s easily divisible by two (I
chose 20").
2. Using a T-square, draw a line that bisects the chord at a 90° angle, and goes from one edge of the circle to the other. The line you draw will be a diameter of the circle. 3. Draw another line that bisects the diameter you just drew, again at a 90° angle. The circle should now be divided into more or less even quarters. 4. Cut the board into quarters, using a table saw (obviously the fastest, easiest option), a circular saw, or a handsaw. 5. You’ve now got four lovely rounded corner shelves! Paint the boards in whatever color suits your fancy (I went with a simple white). You’ll need two to three coats or so of paint. Installing the shelves
7. Now it’s time to determine where your brackets should go.
Ideally, you’ll want to anchor at least one bracket into a stud, of
course. To look for studs, use a stud seeker (available at any hardware
store), or rap along the wall until you hear the sound change from a
hollow echo-ey sound to a dull thud. That having been said, it’s
entirely possible that you won’t be able to find a stud under the area
where the shelf has to go: what will probably happen is that you’ll
discover that the stud will be in the corner (studs are
commonly found every 18" … which means once you’ve found one
under your 12" board, you’re unlikely to find a second that you
can use). At any rate, in the event that you find yourself lacking a
stud, never fear: you can basically put your brackets anywhere under
that line you’ve drawn on the wall, as long as they: 1) aren’t too
close to the corner (you won’t get good support); 2) don’t overlap Hold a bracket to the wall, with one arm of the bracket (the longer one) pressed against the wall and pointing towards the floor while the second arm juts out from the wall, level with the placement line that you drew earlier. Mark the bracket’s placement by penciling a dot in each of its screw holes. Continue with the remaining brackets.
9. Once you’ve got your holes drilled, pop in those anchors, banging them gently with a blunt object to help them go in. 10.
Now you’re ready to screw in your brackets to the wall. For each
bracket, you’ll have to line it up, as best you can, with the
plastic-filled holes. Don’t panic if you find that your holes don’t
line up 11.
Almost t And voilà – you’ve got yourself some corner shelves. If you want the brackets to blend in more with the walls, paint them in the same color as your walls (make sure you mask off the wall area before you start attacking those brackets with the brush). Otherwise, start filling up those shelves!
|
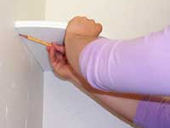 Once
you’ve adjusted the shelf so that it’s in just the right place, mark
where the bottom of the shelf hits the wall, using a pencil. Note: it’s
entirely likely that the shelf will not fit perfectly tightly into the
corner … unless you’ve got a very poorly constructed set of walls,
or you’ve done a truly slipshod job of cutting your board, you should
be able to have one edge of the shelf flush against the wall,
and the second sticking out just slightly. Trust me: it’ll look fine
in the end.
Once
you’ve adjusted the shelf so that it’s in just the right place, mark
where the bottom of the shelf hits the wall, using a pencil. Note: it’s
entirely likely that the shelf will not fit perfectly tightly into the
corner … unless you’ve got a very poorly constructed set of walls,
or you’ve done a truly slipshod job of cutting your board, you should
be able to have one edge of the shelf flush against the wall,
and the second sticking out just slightly. Trust me: it’ll look fine
in the end.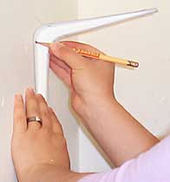 with one another. A good rule of thumb is to position your brackets
approximately 2/3 of the length of the board, as measured from the
corner.
with one another. A good rule of thumb is to position your brackets
approximately 2/3 of the length of the board, as measured from the
corner.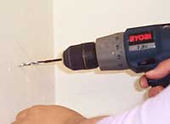 8.
Set the brackets aside for now. Drill a hole at each point in the wall
where a screw has to go. Use a drill bit that’s just slightly smaller
than the width of your screw – for #6 screws, that’ll be a
3/16" bit. Make the holes just deep enough to accommodate the
plastic
anchors.
8.
Set the brackets aside for now. Drill a hole at each point in the wall
where a screw has to go. Use a drill bit that’s just slightly smaller
than the width of your screw – for #6 screws, that’ll be a
3/16" bit. Make the holes just deep enough to accommodate the
plastic
anchors.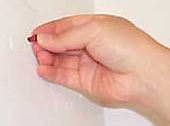
 exactly right – as long as your screw goes somewhere
into the
plastic part, you’ll be fine. Screw your brackets into place, using
the ¾" screws that came with the plastic anchors – an electric
screwdriver comes in handy, but you can do it by hand if you must.
exactly right – as long as your screw goes somewhere
into the
plastic part, you’ll be fine. Screw your brackets into place, using
the ¾" screws that came with the plastic anchors – an electric
screwdriver comes in handy, but you can do it by hand if you must.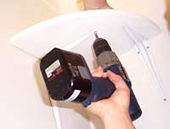 here now … place the
shelf on its brackets and, pressing down firmly on the top of the shelf
while you work, use the ½" screws to attach the brackets to the
bottom of the shelf.
here now … place the
shelf on its brackets and, pressing down firmly on the top of the shelf
while you work, use the ½" screws to attach the brackets to the
bottom of the shelf.