 |
|
crafty
crafty:
make
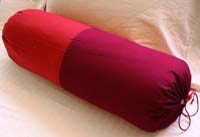
a bolster pillow
|
instructions
|
what
you’ll need time 1
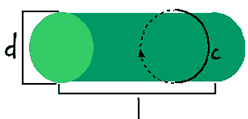
Measure the length,
diameter, and circumference of your bolster pillow or batting roll.
Don’t pull the tape measure too tight as you’re measuring the
circumference, unless you want a very skinny, very firm pillow. (If math
is your idea of fun, of course, it’s technically only necessary to
measure the diameter of the pillow, from which you can then compute the
circumference, since the circumference will equal pi*d.
Or vice versa.) pillow
length = __________ 2
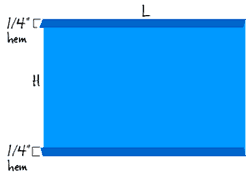
Figure out how much fabric and drawstring you’ll need: fabric
length L = *
Leave a bigger hem allowance for the fabric length if you’re using a
fat cord for your drawstring; the 1” provides enough room for a thin
1/8” satin cord.
Measure,
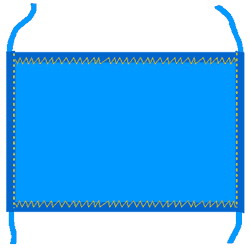
mark, and cut out your fabric. Cut out two drawstrings. 3 Place the fabric with the inside facing up. Press a ¼” hem, lengthwise, along the top and bottom of your fabric, with an iron. Use a zigzag stitch to sew it in place.
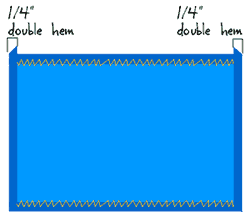
4
Press a 1/4” double hem on the two sides of the fabric, using an iron,
then use a straight stitch, doing your best to keep the stitch as close
to the edge of the hem as possible. This stitch will form the sleeve for
the drawstrings, so it’s important not to let the opening get too
narrow at any point.
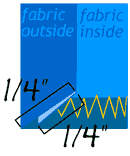
6
With the fabric still inside out, fold it in half length-wise. (You can
pin it in place if you like, but I’m usually too lazy to bother.) Sew
a ¼” seam where the former top and bottom of the fabric meets
together again (this will more or less be marked by the edge of your
zigzag stitch from step 3). Be careful to start your stitch about ¼”
in, or just a hair more, from either side, as you don’t want to sew
your drawstring openings shut.
get printer-friendly directions |


 5
Thread the drawstrings through each of the openings you’ve just made
in step 4. I tape the end of my drawstring to a skinny knitting needle,
then use the needle to help feed the string through, gathering up the
fabric along the needle as I go. Once the tip of the needle pokes
through the other side, I untape the string, hold the string with one
hand, and pull out the knitting needle from the other side. A
disassembled wire coat hanger would work as well. Un-gather and flatten
out the fabric. Tie double knots on each end of each drawstring.
5
Thread the drawstrings through each of the openings you’ve just made
in step 4. I tape the end of my drawstring to a skinny knitting needle,
then use the needle to help feed the string through, gathering up the
fabric along the needle as I go. Once the tip of the needle pokes
through the other side, I untape the string, hold the string with one
hand, and pull out the knitting needle from the other side. A
disassembled wire coat hanger would work as well. Un-gather and flatten
out the fabric. Tie double knots on each end of each drawstring. 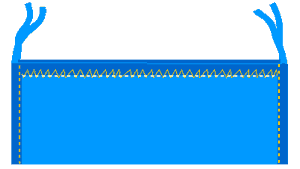
 7
You should now have a lovely rectangle with drawstrings on either end.
Flip the bolster cover right-side-out, then slide in your bolster pillow
(or rolled length of batting). Cinch the ends shut, kick back and enjoy!
7
You should now have a lovely rectangle with drawstrings on either end.
Flip the bolster cover right-side-out, then slide in your bolster pillow
(or rolled length of batting). Cinch the ends shut, kick back and enjoy!